Showing posts with label love. Show all posts

Monday, 4 January 2016

Paris: A Retrospective

Boats on the Seine. Paris April 2015. BH.


ui
io 
"You can’t escape the past in Paris, and yet what’s so wonderful about it is that the past and present intermingle so intangibly that it doesn’t seem to burden." -Allen Ginsberg


This quote from Allen Ginsberg sums up perfectly how I felt about my first trip to Paris in April 2015. The city is new, thriving, on the forefront of art and fashion, yet every corner unveils a story in history that encompasses elegance, romance and tradition.

In all honesty I have been meaning to write this post since the day I stepped off of the Eurostar back at St. Pancras, but it would seem life got in the way of a post that I had already decided would need to be paid much attention on my part. I reconsidered writing this post in November when Paris was in the midst of a horrific terror attack, however I felt then my words may not suit such a sombre time, so it is now, at the start of a new year in which I hope to return to Paris, that I finally assign my visit to a page.


Charlene & myself at the river side overlooking the Eiffel Tower. Paris April 2015. BH.


F
Firstly, cheers to this girl for making my week a not so lonely one! I left on this uni trip thinking I'd be milling around Paris by myself, a thought which I was entirely happy with, due to the fact that I knew only a small handful of names on the sign up sheet however fate had it that I was sat next to Charlene on the Eurostar and no one could fail to make friends with such a lovely girl. So here you go, I introduce to you, my travel companion for the week!


The Louvre. Paris April 2015. BH.

I know the postcards may tell you otherwise, but the Louvre is in fact only about 1% hideous glass pyramids, from a compulsion in the 80's to modernise the museums, and 99% gorgeous architecture. It is the external squares of the museum that enchanted me, even if the miles of corridors inside blistered my feet like a gravel path.

Now here are some highlights from the galleries that aren't the Mona Lisa...

Inside the gallery. The Louvre. Paris April 2105. BH.

Arches of Paris. The Louvre. Paris April 2015. BH.
The Sculpture Galleries. The Louvre. Paris April 2015. BH.

Tourist central at The Louvre. Paris April 2015. BH.

Old and new at The Louvre. Paris April 2015. BH.

From one landmark to the next, and the beautiful Notre Dame cathedral. We were lucky enough to be staying at a hostel in the Marais area of the city, meaning each morning I got to walk over the Seine and past the Notre Dame on my way into the centre of the city. We of course had a guided visit inside the cathedral too, but seeing as I seemed to have bypassed the spiritual gene at birth, I found myself experiencing a far greater connection with the gorgeous gothic architecture of the exterior of the building.


The impressive Flying Buttress' at the rear of the cathedral. Paris April 2015. BH. 

The iconic front façade of the Notre Dame at night. Paris April 2015. BH.

You may assume that a uni trip with free reign of Paris may equal some serious night life but I'm afraid my budget for the week didn't allow such things, and honestly, I am glad of it. instead of wasting my money on a hearty carafe of wine each night, I instead discovered a whole new city lit up by lights. Along with Charlene and Sarah, I discovered street food for easy night-time meals, and gorgeously decadent crepe stands, both of which we utilised nightly sitting by the river or on occasion, in front of the Notre Dame, devouring such treats.

By far my favourite activity however, was a walk along to the Eiffel Tower by the river side at night. The boats cruised by us full of parties and tourists wrapped in coats, with lights glittering as they went, lighting up the river and the buildings lining the banks. The buildings of Paris were quite aside from glowing windows and the occasional set of French doors set ajar, letting the inner curtains billow out, unveiling the quiet private life of Parisians.

I will point out however that such night time walks were not all as peachy and dreamy as they may seem. It should be noted that the metro does not run as late as the London tube and after an hour and a half walk to the Eiffel Tower, finding the train stations closed at 10:30pm meant we faced a 4 mile walk back to the hostel with already blistered feet and aching backs!

My smile says it all. Paris April 2015. BH.

The sparkling Eiffel Tower. Paris April 2015. BH.

Rest stop in what became an 8 mile round trip. Paris April 2015. BH.

Unlike many culturally rich cities I have visited, Paris is different in that you can hide from the crowds of tourists, but you cannot escape the enchanting presence of everyday Parisian life around you. Walking along the river see's people on their office lunch breaks, not crows of tourists fighting for a lunch spot, and sneaking off down side streets can find you in a restaurant with a girl and a violin singing beautifully to the contented crowd without smartphones pointed at her. It is in fact the most beautiful city I have every visited, and where I surprisingly felt most at home.

My regular lunch stop on the Seine just north of the Notre Dame. Paris April 2015. BH.

A spot free from tourists at the lesser known site of Pont Neuf. Paris April 2015. BH.


If only every corner of London was this beautiful. Paris April 2015. BH.
I hope that I will return to Paris extremely soon so I can relive every moment I had in April. It would seem however that since my visit, many of the 'love lock' bridges have been stripped of their namesakes due to over baring weight on the structures, so finally putting a lock of my own upon one may be a distant wish!

Love locks. Paris April 2015. BH.

See my photo series 'From Paris With Love' here!


From Paris With Love

Romance is real in Paris. April 2015. BH.

A new chapter around every corner in Paris. April 2015. BH.


Sunday, 8 November 2015

30 Photos | Day 8: Place to eat


Season's Cafe Deli | Old Amersham | 07.09.2015 |

If a cafe sells breakfast burritos and home-made cakes then it's a sure winner for me, and Season's do both and luckily right on my doorstep in Old Amersham. Having not spent much time in Season's before, I found myself in there a couple of times this summer with the two gorgeous girls pictured above, Vicks & Olivia.

Why is it my favourite?
Although I am more frequent diner at restaurants like Prezzo and Pizza Express, where I can use a cheeky voucher or some ancient clubcard points found at the bottom of a pile of post, it's always nice to pop in somewhere small and local and a bit different from time to time.

My favourite picks from the menu?
For a main I'd definitely choose the breakfast burrito which is the perfect combination of avocado, scrambled egg, spinach, chorizo and sweet chilli, then I'd top that off with a slab of the perfectly moist carrot cake if I could possibly fit it all in!

Next time I go home I'll be sure to pop in to Season's and maybe choose one of my other favourites; Eggs Benedict with a large latte to get me going on a Sunday morning.


Wednesday, 4 November 2015

30 Photos | Day 4: Snack


Coloured Pencil & Ink on Paper | 04.11.2015 |

Since starting work at an ice cream parlour over the summer, I rediscovered that... I LOVE ICE CREAM!!! 

It turns out however, that ice cream doesn't photograph at all well, in fact it looks like a melted mush of garish colour. So instead, it is the result of a very cold quiet day at work that I have drawn an illustration of my favourite eight flavours of ice cream, and here you are, my favourite snack(s). 

It's no wonder I feel like I put on about a stone in weight this summer!


Tuesday, 3 November 2015

30 Photos | Day 3: Cozy Place


Home | Chesham Bois | 03.10.2015 |

Is there any place better than home? I think we all know the answer to that one, and no more so than on a chilly autumn evening, when it is finally acceptable to light the fire for the first time since last winter.

So here it is, my cozy place! Just picture me tucked up on the sofa with a cuppa in one hand and a cat on my lap, in front of the roaring wood burning fire and it feels like winter already.


Monday, 2 November 2015

Butterscotch & Chocolate Doughnuts

It is fair to say that the doughnut maker I received for my birthday last year has not only greatly improved my life, but undoubtedly satisfied all the sweet cravings of my friends and family. I may have only had this remarkable contraption for 10 months now but I have lost count of the hundreds of doughnuts I have churned out and the numerous flavour combinations I have created.

My own doughnut maker

Interchangeable plates -  Cake pop tray

It is unfortunate that this recipe does require such a specific piece of kit as I don't wish to alienate my readers, but if you have a few pounds to spare or need a great gift idea, I couldn't recommend this more. 

It includes three interchangeable plates for doughnuts, cake pops and cupcakes, making it a worthwhile investment for any sweet toothed 'lazy' cook.

Available now for £29.99 on Amazon.


Butterscotch & Chocolate Doughnuts

Prep Time - 10mins
Cooking Time - 15mins
Decorating Time - 30mins
Cost - £2.05
(all ingredients from Tesco)
.
Makes 20-25
Calories per doughnut - 207kcal (x20) or 104kcal (x25)

Ingredients

210g Plain Flour
115g Caster Sugar
220ml Milk
2 Eggs
4 tsp Baking Powder
4 tsp Vegetable Oil
1 Pinch of Salt
1x 49g Butterscotch Flavour Delight Packet (Tesco's own 'Angel Delight')
+ Butter or oil to line

Icing

300g Milk Chocolate
200g Icing Sugar
15ml Water
+ Remaining half of the Butterscotch Flavour Delight Packet


Method

*Pre heat your doughnut maker with the doughnut plates inside by turning it on at the mains. Leave it closed while you make up the mixture*

Place the flour, baking powder, sugar and salt into a mixing bowl and combine before then adding approximately half of the Butterscotch Flavour Delight (25g) to the mix.

Now add the eggs, milk and oil to the bowl and mix thoroughly, either by hand or with a hand mixer, until you have a smooth batter.

Using a wad of kitchen roll, cover the wells of the hot plates with a nob of butter or a dribble of oil, this will stop the doughnuts sticking.

Now it's time to load up your machine with mixture! You want to use about a tablespoon of mixture in each of the seven holes of the plate, and don't worry if the mixture drips on the centre section of each mould, when you close the lid this will be forced out leaving the hole in the centre of the doughnut.

Once full, close the lid and leave for up to 5 minutes. It is at this time when it is up to you to decide how much steam/smoke pouring from the sides is still a good sign or a sign your doughnuts are about done! Once the doughnuts have risen into a distinct shape, take them out of the machine using a teaspoon and place on a cooling rack or chopping board. Repeat until you have used all of your mixture!

Leave your doughnuts to cool while you prepare the decorations.


To Decorate

Break up the chocolate in a microwaveable bowl and microwave at 15 second intervals, stirring in between until all is melted.

Using your fingers, dip each doughnut individualy into the chocolate so it that one side is coated in chocolate. Place onto a cooling rack allowing any excess chocolate to drip off as it cools. Repeat with all your doughnuts.

Make up the icing in a clean bowl using the icing sugar and a minute amount of water (approx 15ml). Once smooth, add the remaining half of the Butterscotch Flavour Delight (24g) and stir until smooth once more. It is at this stage where minimal amounts of water can be added if you feel the mix is too thick to drizzle, it is however important that it is not too thin. If you think your mix is too thin, add more icing sugar at this stage.

Once you have allowed the chocolate covered doughnuts to cool, you need to drizzle them with the icing. The easiest way to do this is to pipe it. If you do not have a piping bag with a small nozzle, put your icing into a sandwich bag and direct it all to one corner, gathering the reamaining bag either with your hands or tie off with an elastic band. Now using a pair of small scissors, chop the very tiny end off of the corner and you will now have a hole to pipe from.

Drizzle all of the doughnuts in whichever pattern you please using your icing. I chose to put stripes on mine!

Allow for the icing to harden, or dig right in, it's up to you, but it's time to enjoy your creation! (You can wash up later!)

Enjoy!

Recipe adapted from cookbook included with Giles & Posner dessert maker.


Sunday, 1 November 2015

30 Photos | Day 1: Person


Olivia | 21 | Lake District National Park | 28.10.2015 |

Who is she to me?
I met this beautiful human in bottom set maths class way back when, in year nine of school, 2007. Since then we bonded over more than our lack of mathematical skills and she is a vital part to my life and happiness, as she is to a great many people, especially our close knit group of girls at home.

Fondest memory?
It would be impossible to pinpoint one moment out of hundreds of happy days spent with Olivia, but a few times that stick in my memory now are, surprisingly perhaps, when I was in fact not as my happiest. In particular, in my gap year between school and university, which was Olivia's first year at university, she surprised me with visits home only announcing her arrival once on my doorstep. On one occasion she sent me a text just to let me know there was a parcel of sweets and other such comforts waiting for me outside the front door, just because she knew that was what I needed. May the delightful surprises continue!

Unacceptable flaws?
She won't eat/drink: Hot cross buns, mince pies, Maltesers, cheese, peanut butter, Malibu rum or honeycomb! Considering these are the majority of my favourite foods, I think I should find a new best friend! (Of course I am entirely joking here, flaw or not, just means more for me!)

Favourite things?
Just like me, you give Olivia a big cup of tea and a nice fluffy cat and she's a happy bunny but throw a few biscuits in there too and she'll treat you like a princess!


Saturday, 31 October 2015

Butternut Squash & Gruyere Soup

THIS. IS. HEAVEN.

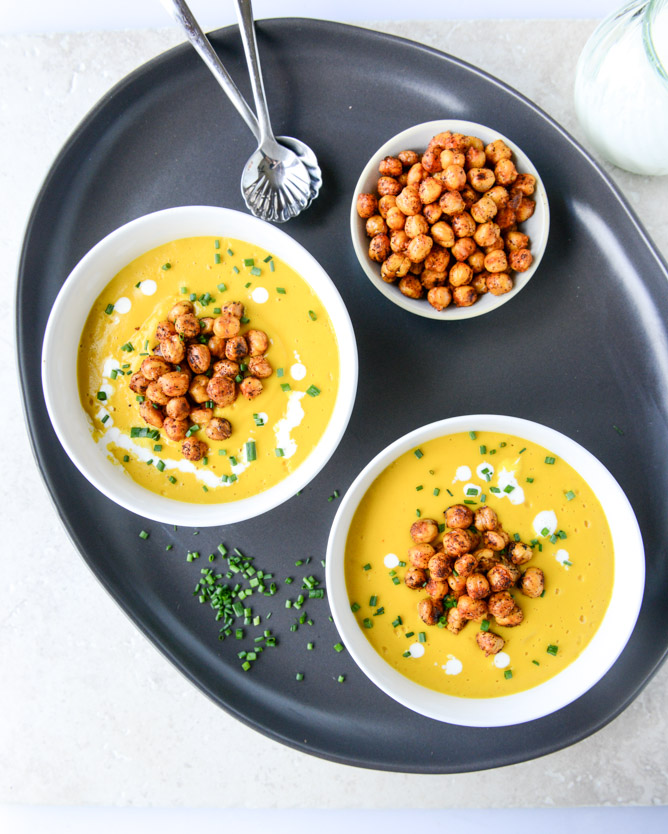
I will not lie to you when I say this, but this soup is honestly to die for. It is the perfect combination of silky cheese, strong earthy tones of squash and a kick of smoked paprika. All in all, it is well worth the effort of making as I am yet to find a fresh soup on the supermarket shelves that tickles my winter taste buds as this recipe does.

I last made this recipe for my 21st birthday dinner and all of my extended family requested the recipe once they had experienced its greatness (if I do say so myself), so here it is for all of you too!

Served with cream and ground black pepper

Prep Time - 25mins
Cooking Time - 30mins
Cost - £6.20 
(all ingredients from Tesco)

Makes - 1.5lts/ serves 4-6
Calories per portion - 538kcal

Ingredients

80g Butter
1 Large Butternut Squash
195g Smoked Gruyere Cheese
1x 400ml Can of Coconut Milk
2x Chicken Stock Cubes (made up to 850ml)
1 Large Onion
4 Garlic Cloves 
1tsp Black Pepper
Salt (to taste/ approx 1/2tsp) 
1/2tsp Nutmeg
1/2tsp Smoked Paprika


Method 

Cut the Onion and Garlic finely and cook in a large saucepan with the Butter until softened (approx 5-8 minutes)

Add black Pepper, Nutmeg and Smoked Paprika to the mix and cook for a further 5 minutes


Peel the squash, and cut into cubes (approx 2x2cm), removing the pips inside. Add the cubes to the onion mix and cook for 5 minutes


Make up the chicken stock in a jug using boiling water (or as instructed on the packet), and add to the saucepan. The squash should almost be all covered by the mix.


Leave to simmer and cook until the squash is soft through, this should take about half an hour on a medium to low heat.

 
Taking the saucepan from the heat, use a hand blender or food processor to blitz the mixture until smooth. 


Add the can of coconut milk to the pan and blitz again until the mixture is smooth once more.

Grate the cheese before putting the pan back on to the heat. Once you have out your saucepan back on the low heat, stir in the grated cheese until melted and combined with the mixture.


Add salt and pepper to taste and serve! You may even decide to serve alongside a slice of rustic crusty bread from your local delicatessen and a drizzle of double cream if you so desire to indulge in such luxury!

Enjoy!

Image From How Sweet Eats - served with spicy chickpeas, cream and chives


Adapted to English measures from the wonderful How Sweet Eats blog.


Friday, 30 October 2015

Devil's Oreo & White Chocolate Cheesecake

This quick and easy recipe had popped up on Facebook one too many times to ignore so I took the calorific plunge and whipped up my own.

Prep Time - 15mins
Cooling Time - 1hr
Cost - £4.11 
(all ingredients from Tesco)
1x Baking tin/tray (approx 9x9")

Makes - 16 squares
Calories per portion - 388kcal

The diet is well and truly out of the window!


Ingredients
Base
2x - 154g Pack Oreo Vanilla (approx 28 biscuits) 
(or any other flavour, I think the peanut butter ones could be even more deadly!)
150g Butter/Margarine

Filling
250 g White chocolate
150 g Cream cheese
1x 154g pack Oreo Vanilla (approx 14 biscuits)
Topping
1x 154g pack Oreo Vanilla (approx 14 biscuits)
100 g Dark chocolate


Method

Ideally using a food processor, or if not available, with a strong hand, combine two packets of Oreos (208g) with the butter until smooth.
Line your tin with cling film and continue to press the mixture firmly into the bottom of your tin until even. 
To make the filling, break the white chocolate into a microwaveable bowl and microwave in 15 second intervals stirring in between, until completely melted. Add the cream cheese to the chocolate in the bowl and beat until the mixture is smooth.the 12 Oreos.
Using your hands or a hard work surface, break up one packet of Oreos while still in the packet or alternatively put the biscuits in a freezer bag a whack them with a rolling pin. Once you have your desired chunks, fold them into the chocolate and cheese mixture. Pour the mixture onto your biscuit base and smooth evenly, pressing the mixture into the corners.
You will now have one packet of Oreos left to use and these are going to form the crunchy topping. Once again, break up the biscuits into chunks either by hand or with a rolling pin. Now it is up to you how you do this part, but the easiest way by far is just to take a handful at a time and sprinkle the biscuits evenly onto the top of your chocolate and cheese layer. Once covered, lightly press the chunks so that they stay put on the top of the mixture. 
Lastly, using the same method as before, melt the dark chocolate in the microwave while remembering to stir every fifteen seconds. Using a teaspoon drizzle (or trickle, or pour, you have artistic license her) the melted chocolate over the top layer of Oreos, finishing off your creation!
If you really can't wait, grab a spoon and dig in, however if you intend to serve these as adorable bitesize squares, then you need to chill it as a whole for about an hour in a fridge or freezer before cutting them.
Enjoy!
Recipe adapted from Sweeten


Wednesday, 8 July 2015

Easy Sugar-Free Lemon Drizzle Cake

Prep Time - 15mins
Cooking time - 1 hour
Cost - £5.70 
(all ingredients from Tesco)
.
Serves 8-10
Calories per portion - 280kcal


I was lucky enough to be invited down to The New Forest with my best friend Olivia's family for a few days this week and I made this sugar-free lemon drizzle cake as a thank you. Olivia's mum has diabetes and this cake was a great surprise for her on my arrival! Its sweetness comes from natural sweeteners xylitol and sucralose, both of which are suitable for diabetics and contain far less calories than regular cane sugar. This recipe was based on one from bbc good food and can be found at the link below, however my version is a little simpler and a little cheaper!

Notes for shopping list

- Xylitol is sold most commonly in packs of 225g and ranges from £2-£3, so I have used Sucralose to make up the other 75g required for this recipe as this is conveniently sold for approx £1 for a 75g pack.


- Tescos conveniently sells 0% fat Greek Yoghurt in pots of exactly 200g for 50p.

- This recipe requires the zest of two lemons and then the juice of one, however I find that I never get enough juice from a lemon and its a messy job, so I was extremely lazy and bought a 'Jiff Lemon' for 50p and used the juice from there and I can then save my real lemon to add to my summer cocktails!
.


Ingredients

225g Self-raising Flour
1 Level tsp Baking Powder
155g Xylitol
75g Sucralose/Splenda
2 Lemons (zest only)
2 Eggs
1 tbsp Milk
200g Greek Yoghurt (0% fat)
125ml Sunflower Oil

For the Drizzle
Juice of 1 lemon/Half a 'Jiff Lemon' (juice)
70g Xylitol


Method

This recipe really is simple and consists of mixing the wet and dry ingredients in seperate bowls before combining them together but before you start any of that you must pre-heat your oven to 160C/Gas 4.

Line a 1.2Ltr loaf tin (22cm x 13cm width, 7cm depth) with greaseproof paper or a purpose loaf tin 'case' like I did. This cases are like huge cupcake cases that fit perfectly in the loaf tin and you can find them at any home-ware shop such as Lakeland or in larger supermarkets such as Sainsbury's.

Mix together all of your dry ingredients; the flour, baking powder, xylitol/sucralose and lemon zest in a large bowl.

Then in a separate bowl mix together all of your wet ingredients; the eggs, sunflower oil, milk and yoghurt. Now combine both in one bowl, stirring thoroughly until you have a smooth batter and finally pour the mix into your lined tin.

Once the mix is in the tin, place in the centre of your pre-heated oven and leave for 45mins before checking, thus allowing the cake to rise. After 45 mins check that the top of the cake isn't becoming too dark in colour and if it is more than a golden brown, cover with foil. 

These last minutes of cooking time give you plenty of time to make your drizzle. slightly heat your lemon juice in a small pan and add the remaining 70g of xylitol until it has fully dissolved.

Continue to cook the cake for another 10-15minutes until there is a rich golden brown crust and a distinctive 'crack' down the top of the cake.

Once the cake is cooked, take it out of the oven and pour over the drizzle. I recommend you do this slowly and with a spoon so that you allow time for the liquid to absorb into the cake and not just flood over the edges of the tin.

Wait until the cake is cool before turning out, especially if you haven't used a loaf tin liner as the greaseproof paper won't come away from the cake as easily if it is still warm.

Finally, put the kettle on and enjoy this fabulously zesty and guilt-free cake with a nice big cuppa!

Adapted from BBC GoodFood