Showing posts with label food. Show all posts

Wednesday, 25 November 2015

30 Photos | Day 25: Luxury


Cote Brasserie | Old Amersham | 04.09.15 |

It is rather rare that I 'go for lunch' as many people seem to, but seeing as for the next six months I am my mother's only daughter at home, she has taken it upon herself to treat me every so often and this meal at Cote was no exception. Oh what it would be to be able to dine out for every meal with such gorgeous French food.


Sunday, 15 November 2015

30 Photos | Day 15: Film


Movies & Pizza| 23 Southfield Road | Oxford | 07.02.2015 |

Sharing pizza with some of my best girl friends can only end in one movie choice and it's fair to say Bridget Jones Diary is truly one of my biggest guilty pleasures. Not only is this film heartbreaking, funny and witty, it joins us girls together in a war against the world of dating, dieting and boys! 

We may not all have a Mr Darcy but we have each other...and pizza of course!


Wednesday, 11 November 2015

30 Photos | Day 11: Tradition

Olivia picking strawberries | Prestwood | 21.07.2015 |

I know most traditions find their roots in years of family history, and though my family share the same traditions as many, like putting up the Christmas tree together and having brunch on birthdays, this year is going to be slightly different due to my big sister being in France for a ski season, so I thought I'd share a newer tradition.

This one may be unseasonal, but one of my favourite new traditions over the past few summers has been strawberry picking with  my best friend Olivia. Here she is finding the best of the harvest at Peterley Manor Farm near her house in Prestwood.

May the strawberries never stop growing and the cream never stop flowing!


Sunday, 8 November 2015

30 Photos | Day 8: Place to eat


Season's Cafe Deli | Old Amersham | 07.09.2015 |

If a cafe sells breakfast burritos and home-made cakes then it's a sure winner for me, and Season's do both and luckily right on my doorstep in Old Amersham. Having not spent much time in Season's before, I found myself in there a couple of times this summer with the two gorgeous girls pictured above, Vicks & Olivia.

Why is it my favourite?
Although I am more frequent diner at restaurants like Prezzo and Pizza Express, where I can use a cheeky voucher or some ancient clubcard points found at the bottom of a pile of post, it's always nice to pop in somewhere small and local and a bit different from time to time.

My favourite picks from the menu?
For a main I'd definitely choose the breakfast burrito which is the perfect combination of avocado, scrambled egg, spinach, chorizo and sweet chilli, then I'd top that off with a slab of the perfectly moist carrot cake if I could possibly fit it all in!

Next time I go home I'll be sure to pop in to Season's and maybe choose one of my other favourites; Eggs Benedict with a large latte to get me going on a Sunday morning.


Friday, 6 November 2015

30 Photos | Day 6: Drink


Toffee Latte | Oxford | 06.11.2015 |

I admit it, I love the speciality Christmas drinks that come around every year, reluctant as I am to buy into such a money making marketing ploy. This year I have found a way around spending almost £4 on a Christmassy coffee...McDonald's!

I know what you're thinking, there is nothing classy or cool about carrying around a 'McCafe' cup normally, but this little penguin is as happy to be in my hand as I am to carry him. Although Starbucks have a heavenly Honey & Almond Hot Chocolate this year and Costa have brought back their Gingerbread Latte, this Toffee Nut Latte from McDonald's for just £2.19 for a regular is honestly just as good, and around 40% cheaper too!

My perfect winter comfort for walking home from the studio in the evening!


Monday, 2 November 2015

Butterscotch & Chocolate Doughnuts

It is fair to say that the doughnut maker I received for my birthday last year has not only greatly improved my life, but undoubtedly satisfied all the sweet cravings of my friends and family. I may have only had this remarkable contraption for 10 months now but I have lost count of the hundreds of doughnuts I have churned out and the numerous flavour combinations I have created.

My own doughnut maker

Interchangeable plates -  Cake pop tray

It is unfortunate that this recipe does require such a specific piece of kit as I don't wish to alienate my readers, but if you have a few pounds to spare or need a great gift idea, I couldn't recommend this more. 

It includes three interchangeable plates for doughnuts, cake pops and cupcakes, making it a worthwhile investment for any sweet toothed 'lazy' cook.

Available now for £29.99 on Amazon.


Butterscotch & Chocolate Doughnuts

Prep Time - 10mins
Cooking Time - 15mins
Decorating Time - 30mins
Cost - £2.05
(all ingredients from Tesco)
.
Makes 20-25
Calories per doughnut - 207kcal (x20) or 104kcal (x25)

Ingredients

210g Plain Flour
115g Caster Sugar
220ml Milk
2 Eggs
4 tsp Baking Powder
4 tsp Vegetable Oil
1 Pinch of Salt
1x 49g Butterscotch Flavour Delight Packet (Tesco's own 'Angel Delight')
+ Butter or oil to line

Icing

300g Milk Chocolate
200g Icing Sugar
15ml Water
+ Remaining half of the Butterscotch Flavour Delight Packet


Method

*Pre heat your doughnut maker with the doughnut plates inside by turning it on at the mains. Leave it closed while you make up the mixture*

Place the flour, baking powder, sugar and salt into a mixing bowl and combine before then adding approximately half of the Butterscotch Flavour Delight (25g) to the mix.

Now add the eggs, milk and oil to the bowl and mix thoroughly, either by hand or with a hand mixer, until you have a smooth batter.

Using a wad of kitchen roll, cover the wells of the hot plates with a nob of butter or a dribble of oil, this will stop the doughnuts sticking.

Now it's time to load up your machine with mixture! You want to use about a tablespoon of mixture in each of the seven holes of the plate, and don't worry if the mixture drips on the centre section of each mould, when you close the lid this will be forced out leaving the hole in the centre of the doughnut.

Once full, close the lid and leave for up to 5 minutes. It is at this time when it is up to you to decide how much steam/smoke pouring from the sides is still a good sign or a sign your doughnuts are about done! Once the doughnuts have risen into a distinct shape, take them out of the machine using a teaspoon and place on a cooling rack or chopping board. Repeat until you have used all of your mixture!

Leave your doughnuts to cool while you prepare the decorations.


To Decorate

Break up the chocolate in a microwaveable bowl and microwave at 15 second intervals, stirring in between until all is melted.

Using your fingers, dip each doughnut individualy into the chocolate so it that one side is coated in chocolate. Place onto a cooling rack allowing any excess chocolate to drip off as it cools. Repeat with all your doughnuts.

Make up the icing in a clean bowl using the icing sugar and a minute amount of water (approx 15ml). Once smooth, add the remaining half of the Butterscotch Flavour Delight (24g) and stir until smooth once more. It is at this stage where minimal amounts of water can be added if you feel the mix is too thick to drizzle, it is however important that it is not too thin. If you think your mix is too thin, add more icing sugar at this stage.

Once you have allowed the chocolate covered doughnuts to cool, you need to drizzle them with the icing. The easiest way to do this is to pipe it. If you do not have a piping bag with a small nozzle, put your icing into a sandwich bag and direct it all to one corner, gathering the reamaining bag either with your hands or tie off with an elastic band. Now using a pair of small scissors, chop the very tiny end off of the corner and you will now have a hole to pipe from.

Drizzle all of the doughnuts in whichever pattern you please using your icing. I chose to put stripes on mine!

Allow for the icing to harden, or dig right in, it's up to you, but it's time to enjoy your creation! (You can wash up later!)

Enjoy!

Recipe adapted from cookbook included with Giles & Posner dessert maker.


Saturday, 31 October 2015

Butternut Squash & Gruyere Soup

THIS. IS. HEAVEN.

I will not lie to you when I say this, but this soup is honestly to die for. It is the perfect combination of silky cheese, strong earthy tones of squash and a kick of smoked paprika. All in all, it is well worth the effort of making as I am yet to find a fresh soup on the supermarket shelves that tickles my winter taste buds as this recipe does.

I last made this recipe for my 21st birthday dinner and all of my extended family requested the recipe once they had experienced its greatness (if I do say so myself), so here it is for all of you too!

Served with cream and ground black pepper

Prep Time - 25mins
Cooking Time - 30mins
Cost - £6.20 
(all ingredients from Tesco)

Makes - 1.5lts/ serves 4-6
Calories per portion - 538kcal

Ingredients

80g Butter
1 Large Butternut Squash
195g Smoked Gruyere Cheese
1x 400ml Can of Coconut Milk
2x Chicken Stock Cubes (made up to 850ml)
1 Large Onion
4 Garlic Cloves 
1tsp Black Pepper
Salt (to taste/ approx 1/2tsp) 
1/2tsp Nutmeg
1/2tsp Smoked Paprika


Method 

Cut the Onion and Garlic finely and cook in a large saucepan with the Butter until softened (approx 5-8 minutes)

Add black Pepper, Nutmeg and Smoked Paprika to the mix and cook for a further 5 minutes


Peel the squash, and cut into cubes (approx 2x2cm), removing the pips inside. Add the cubes to the onion mix and cook for 5 minutes


Make up the chicken stock in a jug using boiling water (or as instructed on the packet), and add to the saucepan. The squash should almost be all covered by the mix.


Leave to simmer and cook until the squash is soft through, this should take about half an hour on a medium to low heat.

 
Taking the saucepan from the heat, use a hand blender or food processor to blitz the mixture until smooth. 


Add the can of coconut milk to the pan and blitz again until the mixture is smooth once more.

Grate the cheese before putting the pan back on to the heat. Once you have out your saucepan back on the low heat, stir in the grated cheese until melted and combined with the mixture.


Add salt and pepper to taste and serve! You may even decide to serve alongside a slice of rustic crusty bread from your local delicatessen and a drizzle of double cream if you so desire to indulge in such luxury!

Enjoy!

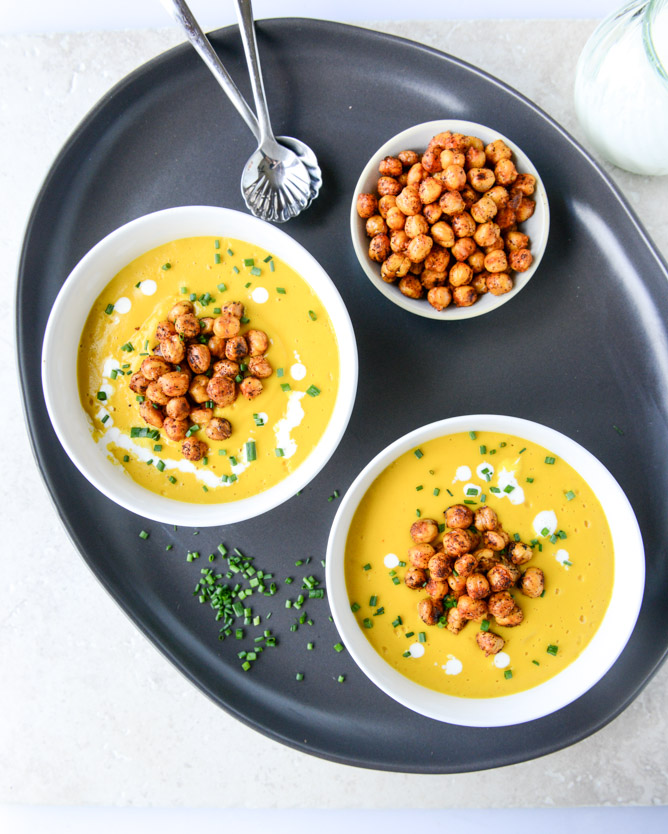
Image From How Sweet Eats - served with spicy chickpeas, cream and chives


Adapted to English measures from the wonderful How Sweet Eats blog.


Friday, 30 October 2015

Devil's Oreo & White Chocolate Cheesecake

This quick and easy recipe had popped up on Facebook one too many times to ignore so I took the calorific plunge and whipped up my own.

Prep Time - 15mins
Cooling Time - 1hr
Cost - £4.11 
(all ingredients from Tesco)
1x Baking tin/tray (approx 9x9")

Makes - 16 squares
Calories per portion - 388kcal

The diet is well and truly out of the window!


Ingredients
Base
2x - 154g Pack Oreo Vanilla (approx 28 biscuits) 
(or any other flavour, I think the peanut butter ones could be even more deadly!)
150g Butter/Margarine

Filling
250 g White chocolate
150 g Cream cheese
1x 154g pack Oreo Vanilla (approx 14 biscuits)
Topping
1x 154g pack Oreo Vanilla (approx 14 biscuits)
100 g Dark chocolate


Method

Ideally using a food processor, or if not available, with a strong hand, combine two packets of Oreos (208g) with the butter until smooth.
Line your tin with cling film and continue to press the mixture firmly into the bottom of your tin until even. 
To make the filling, break the white chocolate into a microwaveable bowl and microwave in 15 second intervals stirring in between, until completely melted. Add the cream cheese to the chocolate in the bowl and beat until the mixture is smooth.the 12 Oreos.
Using your hands or a hard work surface, break up one packet of Oreos while still in the packet or alternatively put the biscuits in a freezer bag a whack them with a rolling pin. Once you have your desired chunks, fold them into the chocolate and cheese mixture. Pour the mixture onto your biscuit base and smooth evenly, pressing the mixture into the corners.
You will now have one packet of Oreos left to use and these are going to form the crunchy topping. Once again, break up the biscuits into chunks either by hand or with a rolling pin. Now it is up to you how you do this part, but the easiest way by far is just to take a handful at a time and sprinkle the biscuits evenly onto the top of your chocolate and cheese layer. Once covered, lightly press the chunks so that they stay put on the top of the mixture. 
Lastly, using the same method as before, melt the dark chocolate in the microwave while remembering to stir every fifteen seconds. Using a teaspoon drizzle (or trickle, or pour, you have artistic license her) the melted chocolate over the top layer of Oreos, finishing off your creation!
If you really can't wait, grab a spoon and dig in, however if you intend to serve these as adorable bitesize squares, then you need to chill it as a whole for about an hour in a fridge or freezer before cutting them.
Enjoy!
Recipe adapted from Sweeten


Wednesday, 8 July 2015

Easy Sugar-Free Lemon Drizzle Cake

Prep Time - 15mins
Cooking time - 1 hour
Cost - £5.70 
(all ingredients from Tesco)
.
Serves 8-10
Calories per portion - 280kcal


I was lucky enough to be invited down to The New Forest with my best friend Olivia's family for a few days this week and I made this sugar-free lemon drizzle cake as a thank you. Olivia's mum has diabetes and this cake was a great surprise for her on my arrival! Its sweetness comes from natural sweeteners xylitol and sucralose, both of which are suitable for diabetics and contain far less calories than regular cane sugar. This recipe was based on one from bbc good food and can be found at the link below, however my version is a little simpler and a little cheaper!

Notes for shopping list

- Xylitol is sold most commonly in packs of 225g and ranges from £2-£3, so I have used Sucralose to make up the other 75g required for this recipe as this is conveniently sold for approx £1 for a 75g pack.


- Tescos conveniently sells 0% fat Greek Yoghurt in pots of exactly 200g for 50p.

- This recipe requires the zest of two lemons and then the juice of one, however I find that I never get enough juice from a lemon and its a messy job, so I was extremely lazy and bought a 'Jiff Lemon' for 50p and used the juice from there and I can then save my real lemon to add to my summer cocktails!
.


Ingredients

225g Self-raising Flour
1 Level tsp Baking Powder
155g Xylitol
75g Sucralose/Splenda
2 Lemons (zest only)
2 Eggs
1 tbsp Milk
200g Greek Yoghurt (0% fat)
125ml Sunflower Oil

For the Drizzle
Juice of 1 lemon/Half a 'Jiff Lemon' (juice)
70g Xylitol


Method

This recipe really is simple and consists of mixing the wet and dry ingredients in seperate bowls before combining them together but before you start any of that you must pre-heat your oven to 160C/Gas 4.

Line a 1.2Ltr loaf tin (22cm x 13cm width, 7cm depth) with greaseproof paper or a purpose loaf tin 'case' like I did. This cases are like huge cupcake cases that fit perfectly in the loaf tin and you can find them at any home-ware shop such as Lakeland or in larger supermarkets such as Sainsbury's.

Mix together all of your dry ingredients; the flour, baking powder, xylitol/sucralose and lemon zest in a large bowl.

Then in a separate bowl mix together all of your wet ingredients; the eggs, sunflower oil, milk and yoghurt. Now combine both in one bowl, stirring thoroughly until you have a smooth batter and finally pour the mix into your lined tin.

Once the mix is in the tin, place in the centre of your pre-heated oven and leave for 45mins before checking, thus allowing the cake to rise. After 45 mins check that the top of the cake isn't becoming too dark in colour and if it is more than a golden brown, cover with foil. 

These last minutes of cooking time give you plenty of time to make your drizzle. slightly heat your lemon juice in a small pan and add the remaining 70g of xylitol until it has fully dissolved.

Continue to cook the cake for another 10-15minutes until there is a rich golden brown crust and a distinctive 'crack' down the top of the cake.

Once the cake is cooked, take it out of the oven and pour over the drizzle. I recommend you do this slowly and with a spoon so that you allow time for the liquid to absorb into the cake and not just flood over the edges of the tin.

Wait until the cake is cool before turning out, especially if you haven't used a loaf tin liner as the greaseproof paper won't come away from the cake as easily if it is still warm.

Finally, put the kettle on and enjoy this fabulously zesty and guilt-free cake with a nice big cuppa!

Adapted from BBC GoodFood